- Published on
Zero-Trust Database and SSH Access with HCP Boundary on Kubernetes — A Hands-On POC
- Authors

- Name
- Christian TCH
Zero-Trust Database and SSH Access with HCP Boundary on Kubernetes — A Hands-On POC
This article is a hands-on POC of HCP Boundary Essentials, the standard HCP-managed tier, running on a local Minikube cluster, brokering access to a MySQL database and an SSH target — with no direct network exposure and credential injection handled by Boundary itself. To access the targets, you use either the Boundary CLI or Boundary Desktop. Credentials are stored in Boundary's static credential store for this POC. A follow-up article will cover the next step: replacing static credentials with HashiCorp Vault's database secrets engine for fully dynamic, per-session credential generation.
Before diving in, here is the tier context for this setup:
- HCP Boundary Essentials: baseline managed HCP tier for secure session brokering and target access workflows.
- HCP Boundary Plus: managed HCP tier that adds advanced capabilities such as session recording.
- Boundary Enterprise (self-managed): customer-managed deployment model for Boundary components and enterprise features.
- Boundary Community Edition (open source, self-managed): you run and manage everything yourself (controllers, workers, upgrades, operations).
For this POC, I used HCP Boundary Essentials for the managed controller plus the Boundary Enterprise worker image in Kubernetes. I chose this combination because it keeps the control plane fully managed in HCP while still allowing me to run the worker close to private targets in-cluster and route access without exposing those targets directly.
If you want to compare the other options, see the HCP Boundary documentation and the Boundary product documentation.
All the code is available on GitHub.
What I Wanted to Prove
The goal was not to deploy Boundary in production — it was to validate the core promise: can you give a user access to a database and an SSH server without ever exposing those services directly, without the user knowing the credentials, and with full session auditability?
The constraints I set:
- Both targets (MySQL and SSH) are only reachable via
ClusterIP— no NodePort, no LoadBalancer, no direct access from outside the cluster - The Boundary worker runs inside the cluster and proxies all sessions
- Credentials are stored in Boundary and injected at session time — the user never sees a password
- The entire Boundary configuration (scopes, targets, users, roles) is managed with Terraform
Architecture
HCP Boundary (managed controller — HashiCorp Cloud Platform)
        │
        │  worker registration (PKI-based, outbound only)
        ▼
Minikube cluster (namespace: boundary)
├── boundary-worker   NodePort :30202   ← proxy for all sessions
├── ssh-target        ClusterIP :2222   ← OpenSSH, not reachable directly
└── mysql             ClusterIP :3306   ← MySQL 8.0, not reachable directly
The controller runs on HCP — fully managed by HashiCorp, no infrastructure to operate. The worker runs as a pod inside Minikube and registers itself with the controller over an outbound connection. This is the key architectural point: the worker initiates the connection to HCP, so no inbound firewall rules are needed on the cluster side.
When a user connects to a target using Boundary CLI or Boundary Desktop, the flow is:
- The user authenticates to HCP Boundary using the configured auth method (password in this POC)
- HCP Boundary evaluates grants and authorizes the session
- The client receives session details and connects to the worker's NodePort (
192.168.49.2:30202) - The worker proxies the connection to the target's ClusterIP service
- Boundary injects credentials (SSH) or brokers credentials (MySQL)
The targets never receive a connection from outside the cluster. The only externally reachable component is the worker's proxy port.
Kubernetes Setup
For Kubernetes, I used Minikube intentionally to simplify local setup, testing, and iteration for this POC.
Namespace
Everything runs in a dedicated boundary namespace:
apiVersion: v1
kind: Namespace
metadata:
  name: boundary
The Worker
The worker is a single pod running the Boundary Enterprise image, with a ConfigMap holding its HCL configuration:
worker {
  public_addr = "192.168.49.2:30202"
  auth_storage_path = "/var/lib/boundary"

  initial_upstreams = ["a6c5f3d8-06c5-4ddf-ad50-a58bf47f604e.proxy.boundary.hashicorp.cloud:9202"]

  tags {
    type   = ["worker", "k8s", "minikube"]
    region = ["local"]
  }
}
Two things worth noting:
public_addris the address clients will connect to when establishing sessions. It must be reachable from outside the cluster — here it is the Minikube IP with the NodePort.initial_upstreamspoints to the HCP cluster's proxy endpoint. The worker connects outbound to this address to register itself and receive session instructions.
The worker tags (type = ["k8s"]) are used later in Terraform to filter which worker handles which target — a useful pattern when you have workers in multiple environments.
The worker service exposes port 9202 as a NodePort:
spec:
  type: NodePort
  ports:
    - port: 9202
      targetPort: 9202
      nodePort: 30202
The SSH Target
A standard OpenSSH container (linuxserver/openssh-server) with a boundary-user account. The service is ClusterIP only — no external access:
spec:
  type: ClusterIP
  ports:
    - port: 2222
      targetPort: 2222
The user password is stored in a Kubernetes Secret and injected as an environment variable into the container. Boundary will retrieve this password from its own credential store and inject it at session time — the connecting user never types it.
The MySQL Target
MySQL 8.0 with a dedicated boundary database user. Again, ClusterIP only. An init script grants the boundary user access from any IP within the cluster (the worker proxies the connection, so MySQL sees the worker's pod IP):
GRANT ALL PRIVILEGES ON demo.* TO 'boundary'@'%';
FLUSH PRIVILEGES;
Boundary Configuration with Terraform
The entire Boundary logical configuration — scopes, hosts, targets, credentials, users, roles — is managed with Terraform using the hashicorp/boundary provider.
Scopes
Boundary uses a two-level scope hierarchy: org → project. The org is the top-level container; projects hold the actual targets and host catalogs.
resource "boundary_scope" "org" {
  name     = "demo-org"
  scope_id = "global"
  auto_create_admin_role   = true
  auto_create_default_role = true
}

resource "boundary_scope" "project" {
  name     = "k8s-minikube"
  scope_id = boundary_scope.org.id
  auto_create_admin_role = true
}
Host Catalog and Hosts
A static host catalog groups the targets. Each host maps to a Kubernetes DNS name — the ClusterIP service DNS that only resolves inside the cluster:
resource "boundary_host_catalog_static" "minikube" {
  name     = "minikube-catalog"
  scope_id = boundary_scope.project.id
}

resource "boundary_host_static" "ssh" {
  name            = "ssh-target"
  host_catalog_id = boundary_host_catalog_static.minikube.id
  address         = "ssh-target.boundary.svc.cluster.local"
}

resource "boundary_host_static" "mysql" {
  name            = "mysql-target"
  host_catalog_id = boundary_host_catalog_static.minikube.id
  address         = "mysql.boundary.svc.cluster.local"
}
The worker resolves these DNS names from inside the cluster. The controller (on HCP) never needs to reach these addresses directly — it only instructs the worker where to connect.
Credential Stores and Credentials
Credentials are stored in Boundary's static credential store. For this POC I used username/password credentials — in a production setup you would integrate with Vault's dynamic secrets engine to generate per-session credentials.
resource "boundary_credential_store_static" "ssh" {
  name     = "ssh-credentials"
  scope_id = boundary_scope.project.id
}

resource "boundary_credential_username_password" "ssh" {
  name                = "ssh-boundary-user"
  credential_store_id = boundary_credential_store_static.ssh.id
  username            = "boundary-user"
  password            = var.ssh_target_password
}
Targets
This is where the two credential models diverge.
SSH target — credential injection:
resource "boundary_target" "ssh" {
  name         = "ssh-minikube"
  type         = "ssh"
  scope_id     = boundary_scope.project.id
  default_port = 2222

  host_source_ids = [boundary_host_set_static.ssh.id]

  injected_application_credential_source_ids = [
    boundary_credential_username_password.ssh.id
  ]

  egress_worker_filter = "\"k8s\" in \"/tags/type\""
}
With injected_application_credential_source_ids, Boundary injects the SSH credentials directly into the session. The user runs boundary connect ssh -target-id=<id> and gets a shell — no password prompt, no credential visible.
MySQL target — credential brokering:
resource "boundary_target" "mysql" {
  name         = "mysql-minikube"
  type         = "tcp"
  scope_id     = boundary_scope.project.id
  default_port = 3306

  host_source_ids = [boundary_host_set_static.mysql.id]

  brokered_credential_source_ids = [
    boundary_credential_username_password.mysql.id
  ]

  egress_worker_filter = "\"k8s\" in \"/tags/type\""
}
With brokered_credential_source_ids, Boundary opens a local tunnel and displays the credentials to the client at connection time. The user passes them to their MySQL client. The credentials are still never stored locally — they are fetched from Boundary's store for each session.
The egress_worker_filter on both targets ensures sessions are routed through the worker tagged with k8s — the one running inside Minikube that can resolve the ClusterIP DNS names.
Users and Roles
A demo user with a read-only role — can list and view targets but not connect:
resource "boundary_role" "k8s_access" {
  name      = "k8s-read-only"
  scope_id  = boundary_scope.project.id

  principal_ids = [boundary_user.demo_user.id]

  grant_strings = [
    "ids=*;type=target;actions=list,read",
    "ids=*;type=session;actions=list,read:self",
  ]
}
To grant connection rights, you would add actions=authorize-session to the target grant. This separation — seeing targets vs. connecting to them — is one of Boundary's more useful access control primitives.
How the Tunnel Works
Understanding what happens under the hood when a session is established helps clarify why Boundary's security model holds.
Controller ↔ Worker: gRPC over TLS
The worker maintains a persistent outbound connection to the HCP controller over gRPC multiplexed on TLS. This is the control plane channel — the controller sends session instructions to the worker over this connection, and the worker reports session status back.
Because this connection is outbound from the worker, no inbound firewall rules are needed on the cluster side. The worker just needs egress to the HCP proxy endpoint on port 9202. This is what makes the architecture work in environments where you cannot open inbound ports — Kubernetes clusters behind NAT, private VPCs, on-premises networks.
The worker uses ALPN (Application-Layer Protocol Negotiation) to multiplex multiple protocol types over the same TLS connection on port 9202. ALPN is a TLS extension that lets the client advertise which application protocol it wants to use during the TLS handshake, before any application data is exchanged. Boundary uses this to run both the control plane (gRPC) and the session data plane over the same port without ambiguity.
Client ↔ Worker: Authenticated TLS proxy
When a user runs boundary connect, the Boundary client:
- Calls the HCP controller API to authorize a session — the controller validates the user's identity and grants
- Receives a session token and the worker's
public_addr - Opens a local listening port (e.g.,
127.0.0.1:54321) - Establishes a TLS connection to the worker's proxy port (
192.168.49.2:30202) and presents the session token
The worker validates the session token against the controller, then opens a TCP connection to the target's ClusterIP service inside the cluster. From that point, the worker acts as a transparent TCP proxy between the client's local port and the target.
boundary CLI          worker pod              target pod
127.0.0.1:54321  ──►  192.168.49.2:30202  ──►  mysql.boundary.svc.cluster.local:3306
     TLS + session token          plain TCP (inside cluster)
The target sees a connection from the worker's pod IP — not from the user's machine. The user's machine never has a direct network path to the target.
What Boundary Does Not Do
Boundary is not a VPN. It does not assign the client an IP address on the target network, does not route all traffic through the tunnel, and does not give the client any network visibility beyond the specific port of the specific target they are authorized to reach. Each session is a point-to-point TCP proxy for one target, one port, one authorized user, for a limited duration.
This is the fundamental difference from a VPN: a VPN grants network access, Boundary grants session access.
Worker Registration
Before connecting, the worker needs to be registered with HCP. On first start, the worker generates an activation token visible in its logs:
kubectl logs -n boundary -l app=boundary-worker | grep "Worker Auth Registration Request"
Copy the token and register the worker from the HCP Boundary UI: Workers → New Worker → paste token. After registration, the worker appears as active in the console and sessions can be routed through it.
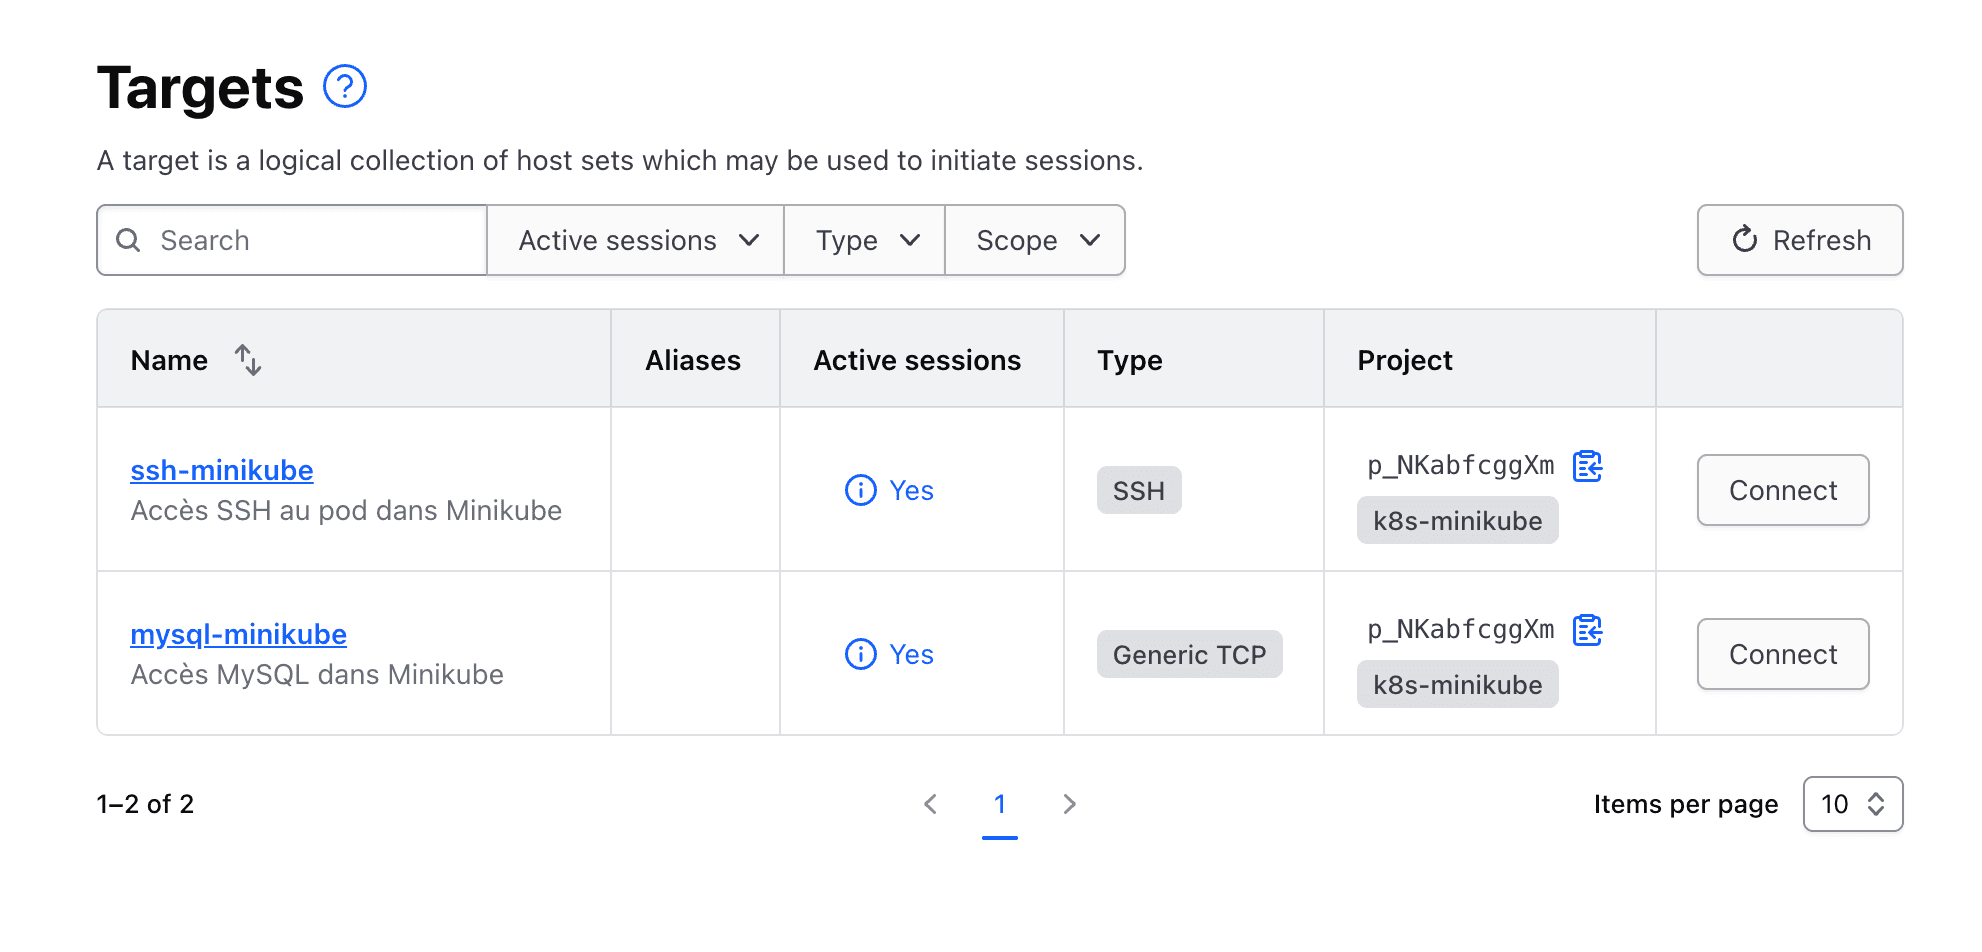
Once the Terraform configuration is applied, both targets appear in the HCP Boundary console:
SSH Connection
boundary authenticate \
  -addr=https://a6c5f3d8-06c5-4ddf-ad50-a58bf47f604e.boundary.hashicorp.cloud \
  -auth-method-id=<auth_method_id>

boundary connect ssh -target-id=$(terraform output -raw ssh_target_id)
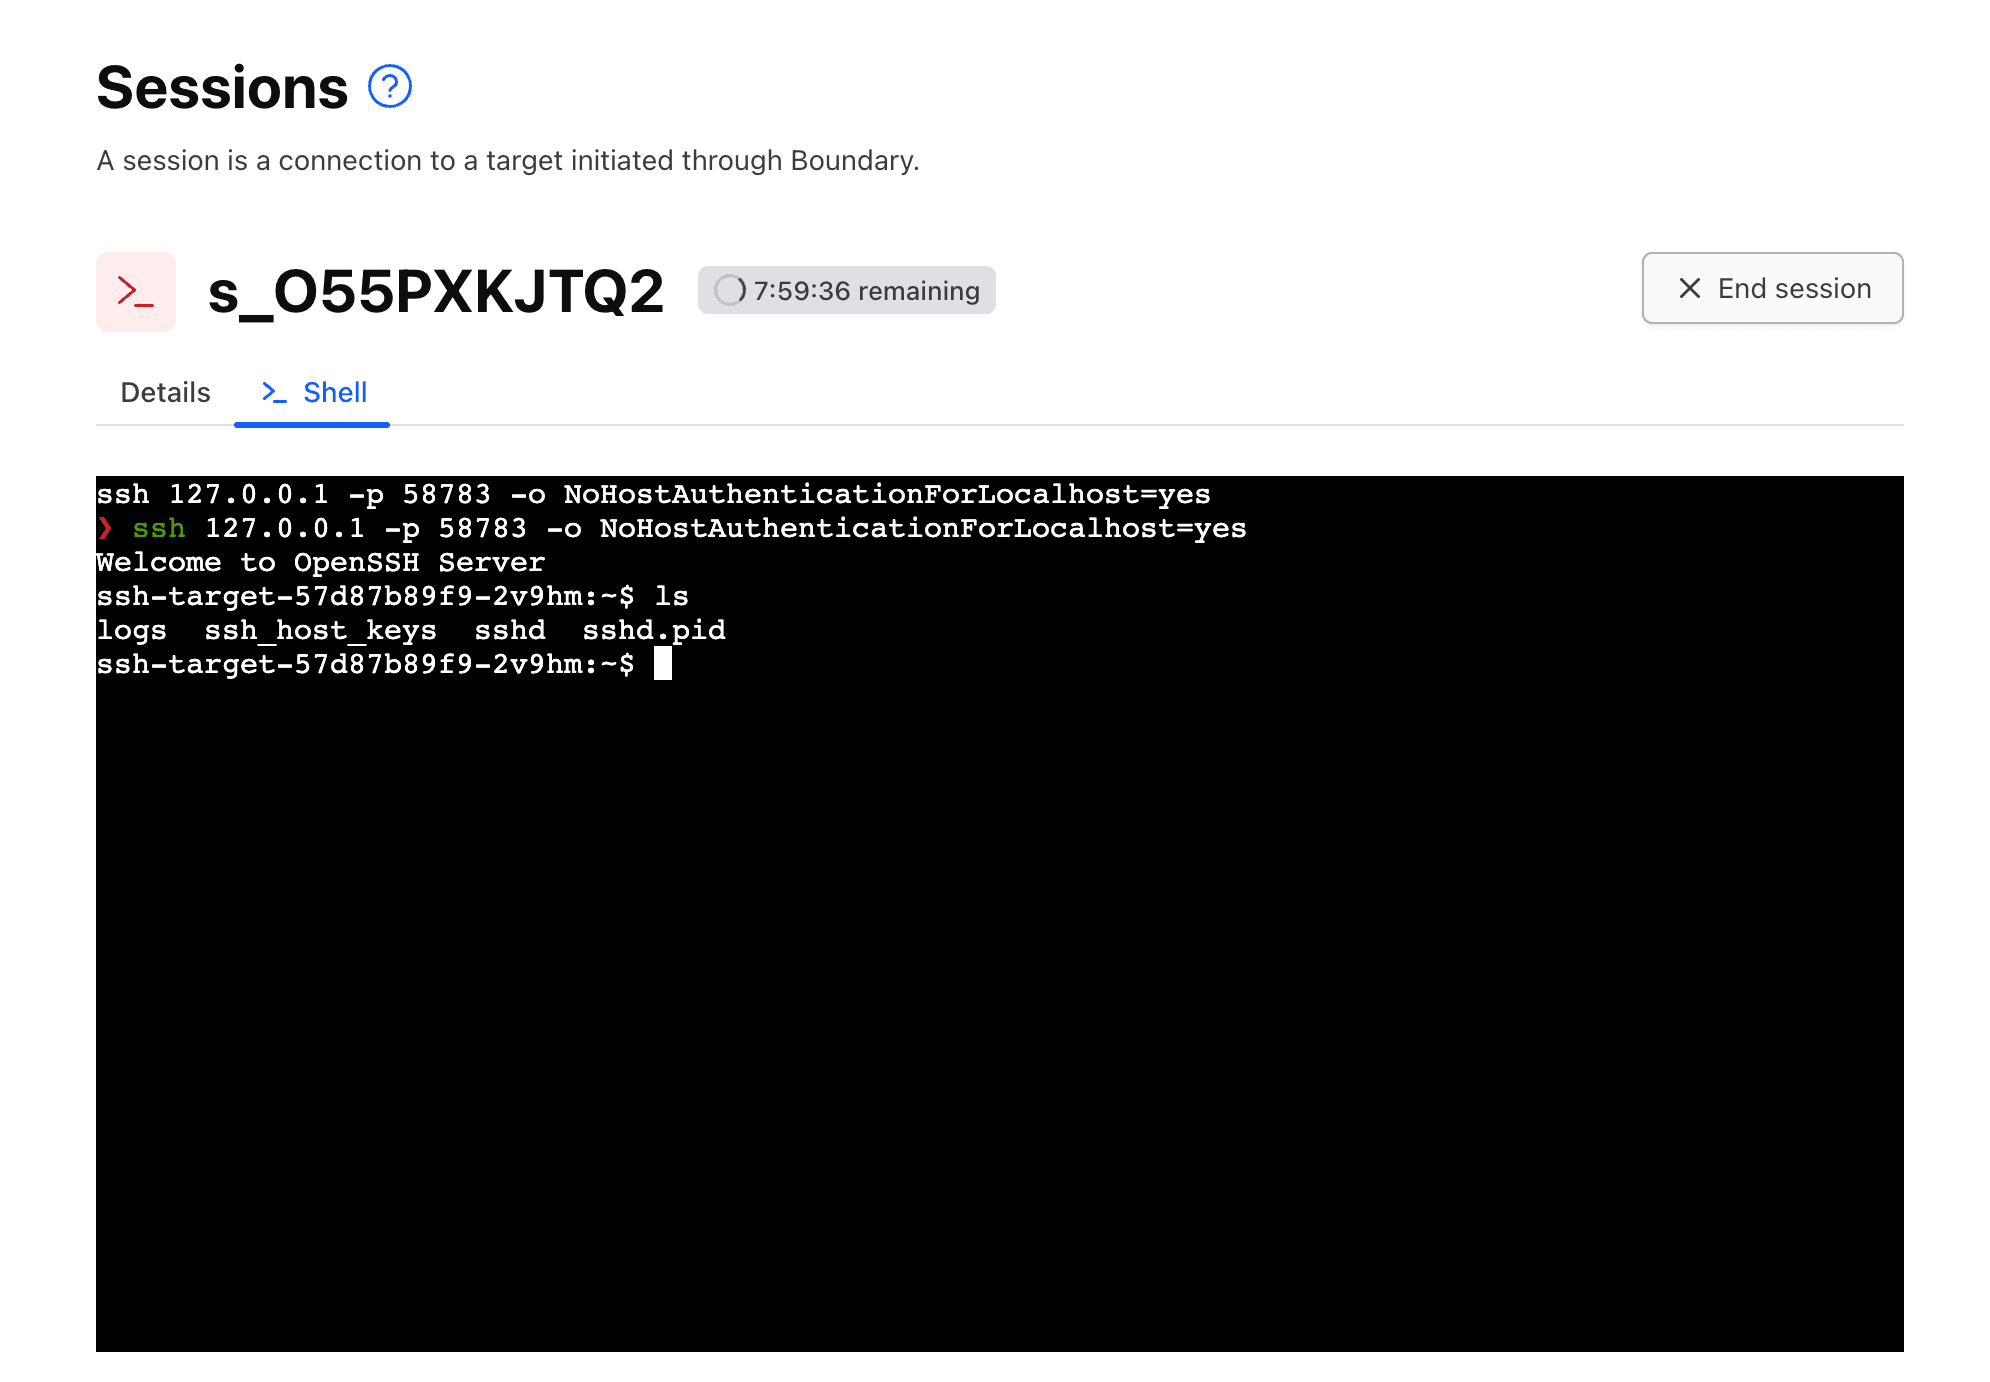
Boundary opens the SSH session directly from either the Boundary CLI or Boundary Desktop. No password prompt — the credential is injected transparently. The session is recorded in Boundary Desktop and visible in the Sessions tab.
MySQL Connection
boundary connect \
  -target-id=$(terraform output -raw mysql_target_id) \
  -exec mysql -- \
    -u {{boundary.username}} \
    -p{{boundary.password}} \
    -h {{boundary.ip}} \
    -P {{boundary.port}} \
    demo
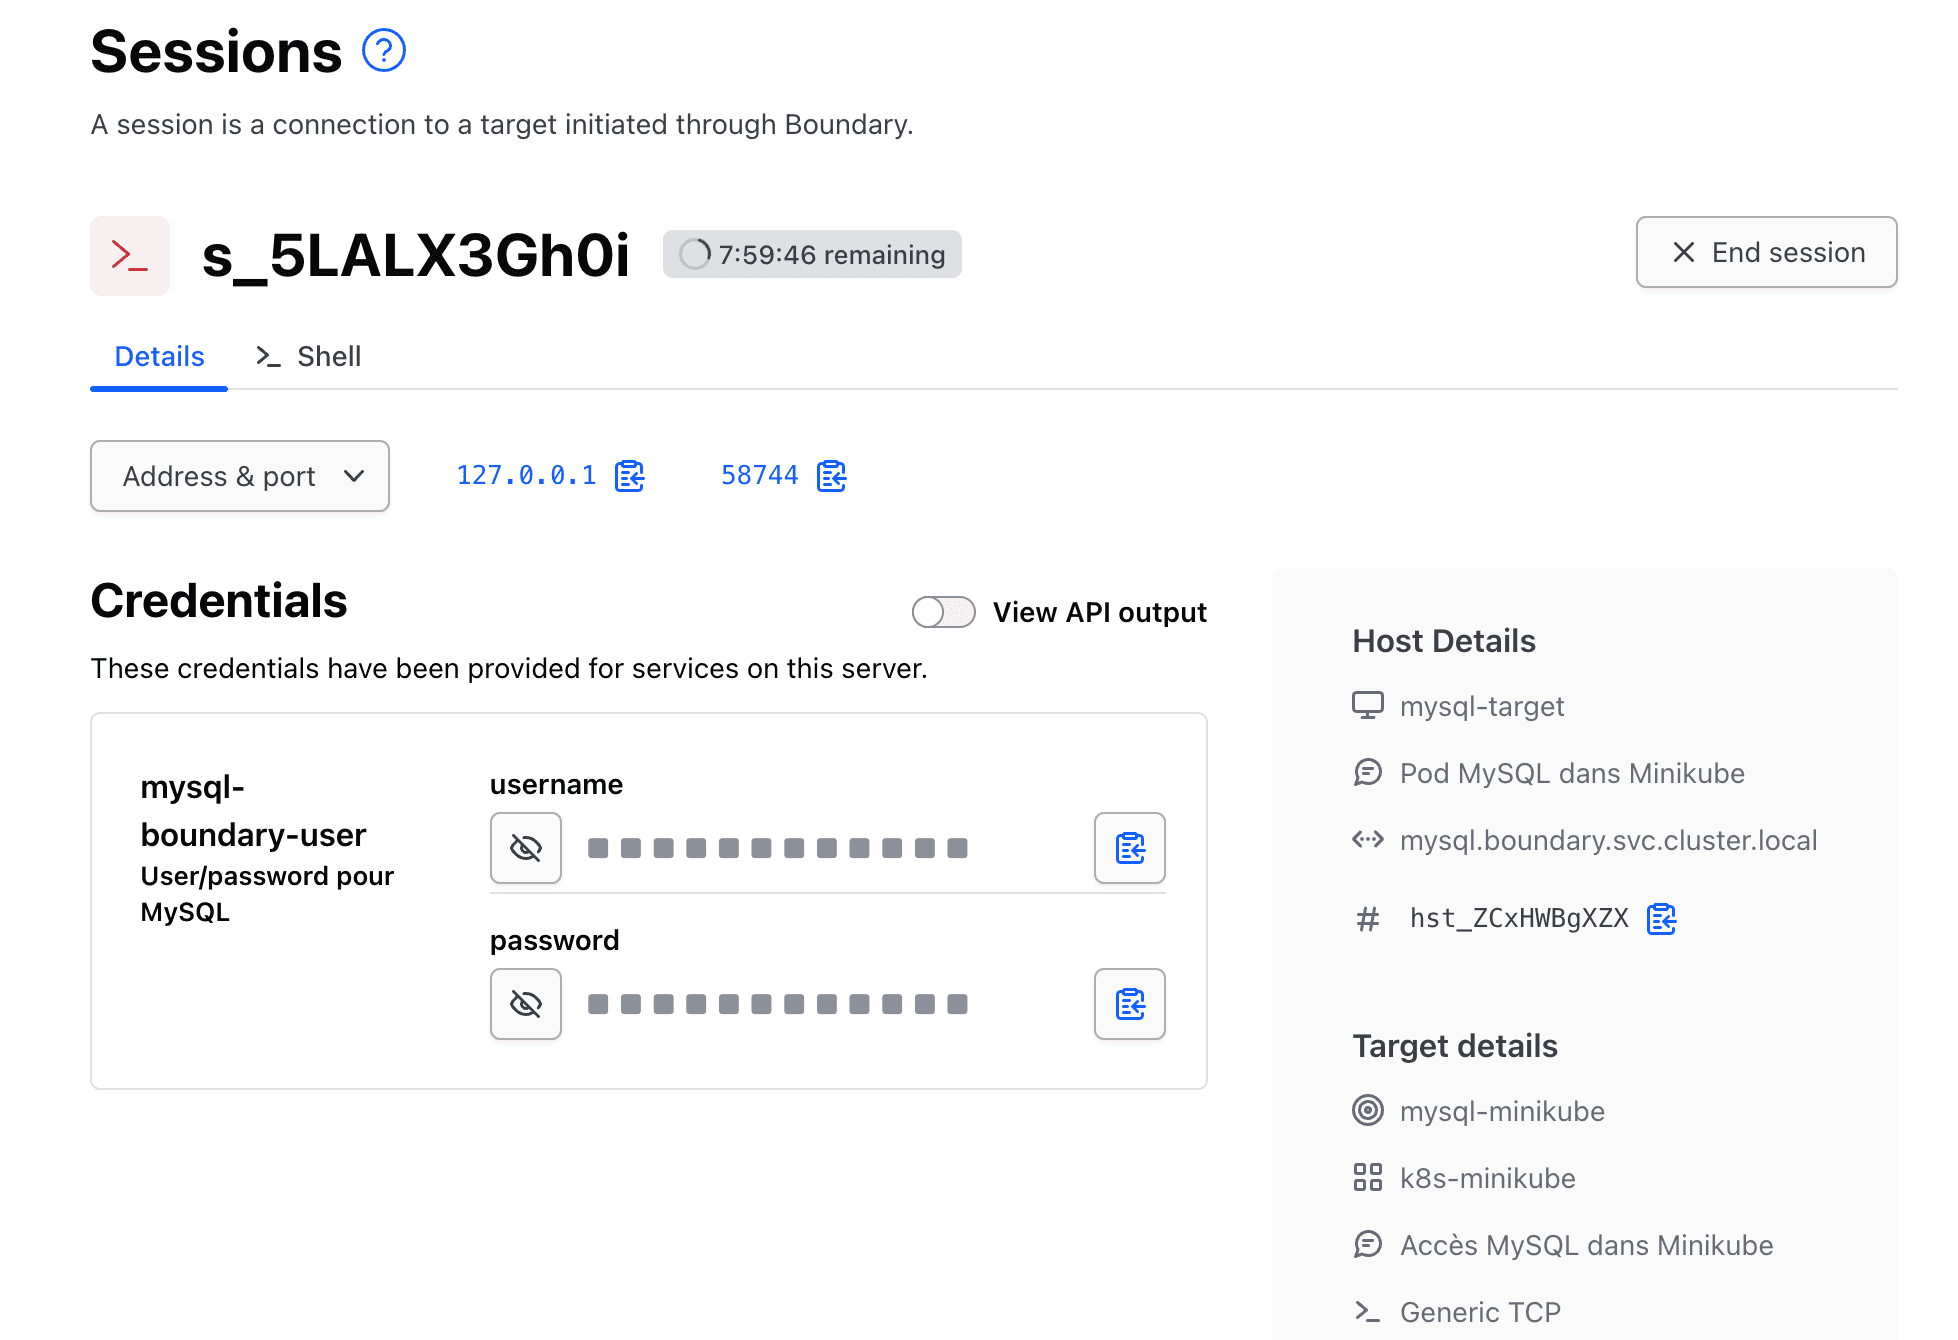
Boundary opens a local proxy port, displays the brokered credentials, and passes them to the mysql client via the template variables. The connection goes through the worker to the ClusterIP service — MySQL never sees a connection from outside the cluster.
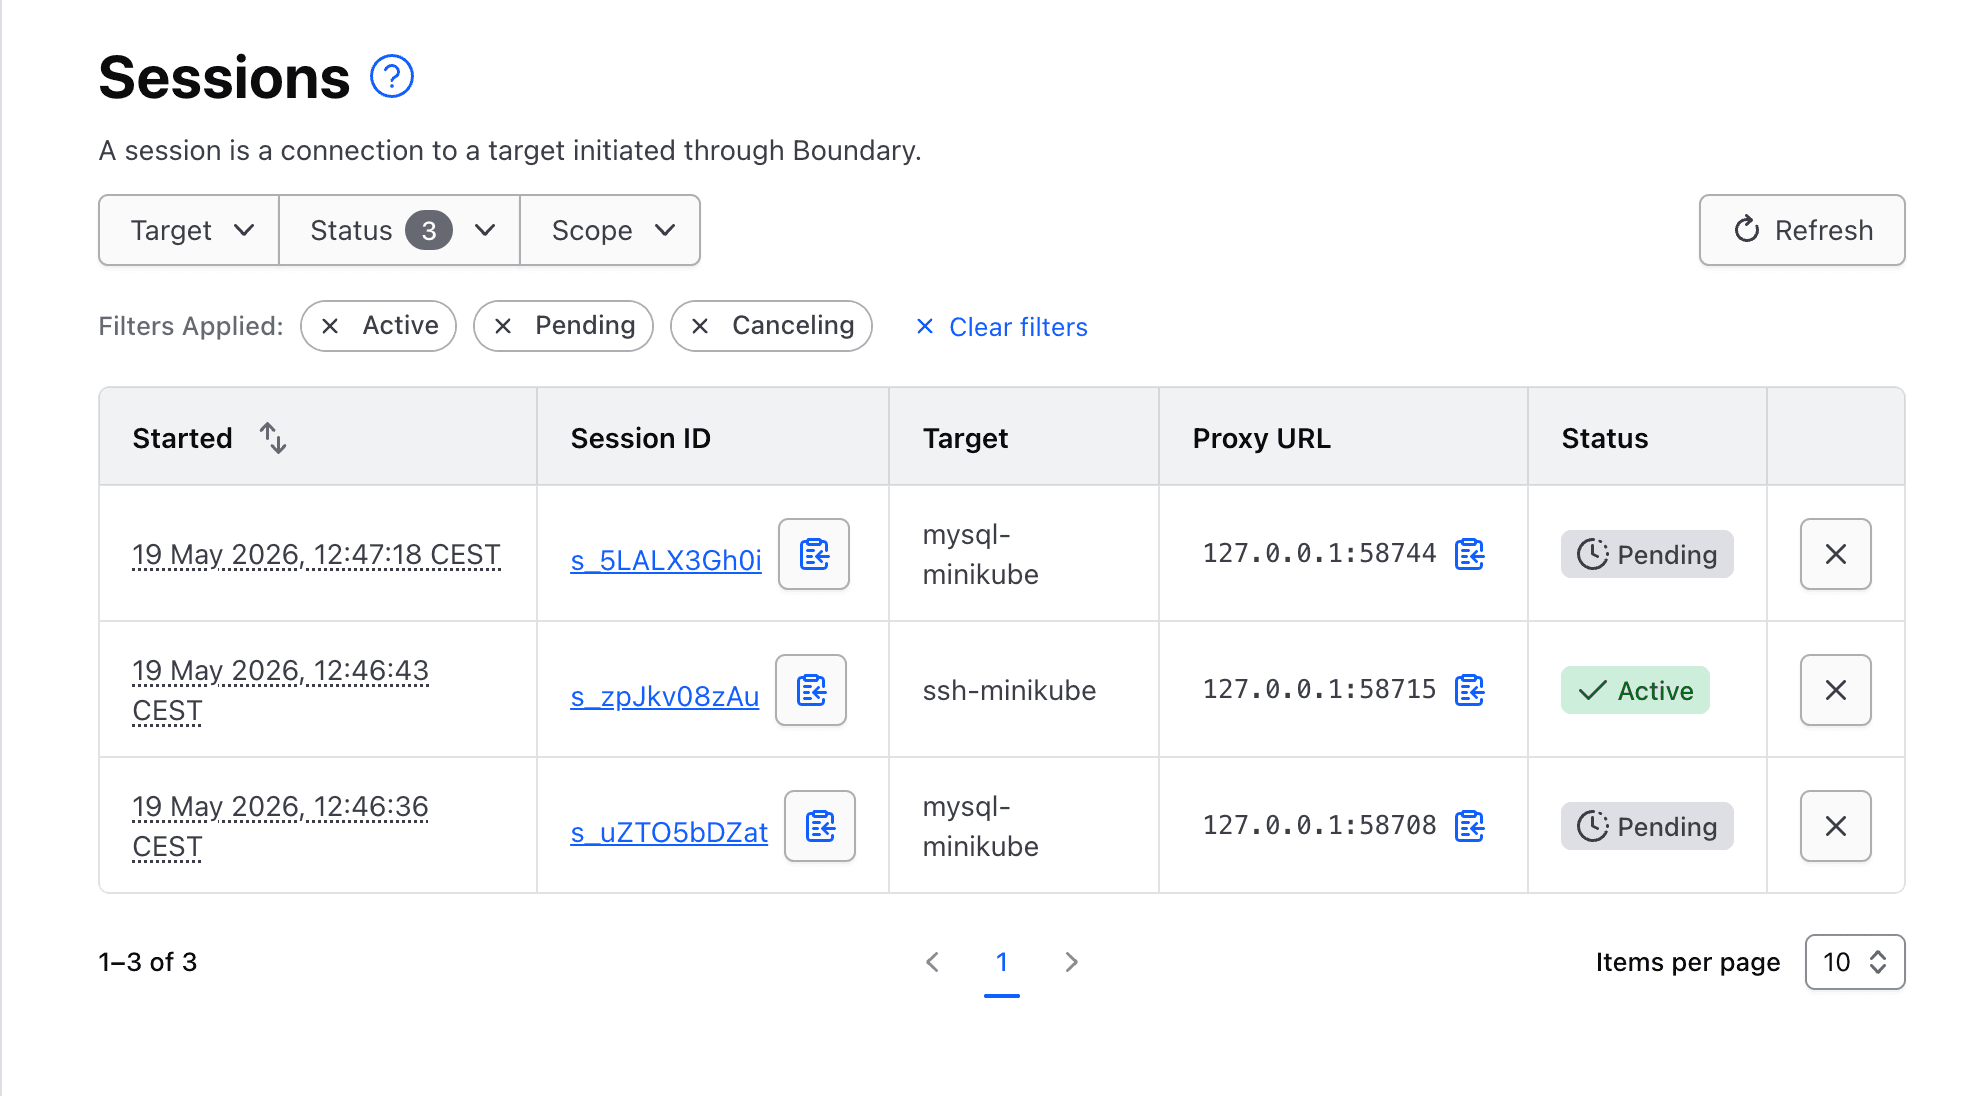
Both sessions are visible in the Boundary Desktop Application with their duration, target, and user:
What Worked Well
Zero direct exposure. Both targets are ClusterIP only. There is no path to reach them without going through Boundary. This is the core promise and it holds.
Worker registration is clean. The outbound-only registration model means no inbound firewall rules, no VPN, no network peering. The worker connects to HCP and that is it.
Terraform-managed configuration. The entire logical configuration is code. Scopes, targets, credentials, users, roles — all reproducible, all version-controlled. This is a significant advantage over portal-heavy PAM tools where configuration lives in a UI.
Credential injection for SSH is seamless. boundary connect ssh just works. No password, no key management, no friction for the user.
Worker filters are powerful. The egress_worker_filter on targets lets you route sessions to specific workers based on tags. In a multi-environment setup (dev, staging, prod, different cloud regions), this gives you precise control over which worker handles which target without any manual routing configuration.
Limitations and Honest Notes
Static credentials are not the end goal. This POC uses Boundary's static credential store — credentials are stored in Boundary and rotated manually. The real power comes from integrating with Vault's database secrets engine, which generates a unique username and password per session and revokes them when the session ends. That is a separate setup I will cover in a follow-up.
The Enterprise image is required for the worker. The self-managed worker used here requires the Enterprise image (boundary-worker-enterprise). The open-source Boundary image does not support PKI worker registration with HCP. For a fully open-source setup, you would need to run your own controller as well.
Session recording requires HCP Boundary Plus. The Essentials tier used in this POC is the standard HCP-managed option and does not include session recording. You can see that sessions happened and their duration, but not a full recording of what was done. Session recording (including database query capture) is a Plus feature, while the self-managed Boundary Enterprise image is a separate deployment model used for the worker in this POC.
Brokered credentials for MySQL are less seamless than injected. The user still receives the credentials and passes them to the client. It is better than a shared password in a spreadsheet, but it is not truly passwordless. Vault integration solves this.
Closing Thoughts
HCP Boundary delivers on its core promise: zero direct network exposure, identity-based access control, and credential brokering — all managed as code. For teams already in the HashiCorp ecosystem (Vault, Terraform), it fits naturally. The Terraform provider is mature, the worker registration model is clean, and the separation between seeing targets and connecting to them gives you fine-grained access control without complexity.
The gap between this POC and a production-ready deployment is primarily Vault integration for dynamic credentials and session recording for full auditability. Both are well-documented and the architecture supports them without changes to the core setup.
The full code for this POC is available on GitHub.
Related reading:
- HashiCorp Boundary documentation — official docs for concepts, configuration, and deployment.
- Vault database secrets engine — dynamic per-session credential generation for MySQL, PostgreSQL, and more.